Artwork Essentials: A Comprehensive Guide to ATA Bus Wrap Templates
Welcome to our bus wrap template guide.
We’ll show you how to use our templates, step-by-step, making your design process smoother. Whether you’re a seasoned graphic designer or know just enough to to get the job done, our templates are here to help you properly design a print-ready file for your new bus wrap campaign.
We’ve created a large catalog of custom PDF templates for all buses in the transit markets we represent. These include Full, Half, and King Kong Wraps for either street side or curb side, as well as Rear Wraps. Since each transit has various makes and models of buses, ensure you obtain the correct template from your salesperson before you get started. Let’s dive in!
1. Review our design guide for outdoor advertising to ensure you are creating an effective advertisement: EFFECTIVE DESIGN
2. Obtain the correct template from your salesperson.
3. Using Adobe Illustrator, Photoshop, or InDesign, open the template. Note that all templates are designed at 1/10 scale. (The following examples are shown in Adobe Illustrator.)
4. Open the Layers Panel. You’ll see that these are layered files. The template and measurements layers will be locked. There will be a layer that is labeled Artwork or Art. This is the layer you will design on or place your design elements.
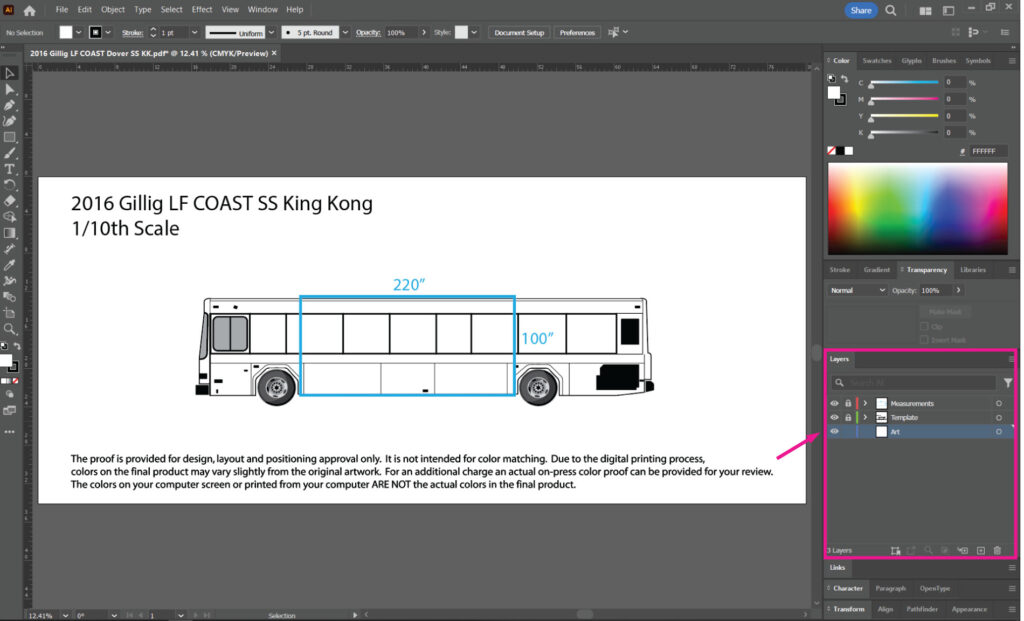
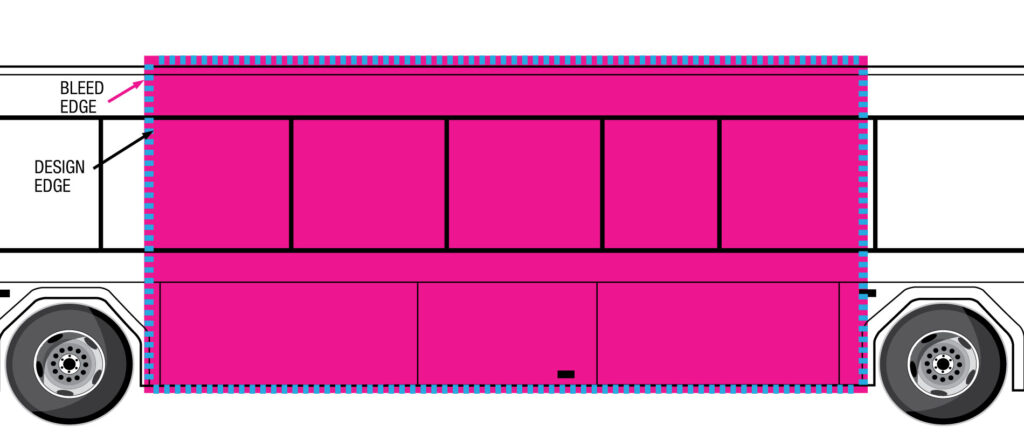
5. The cyan line, either dotted or solid, is the area on the bus that your design will be installed. Important design elements must stay clear of the design edge by 3” (the design edge is the INSIDE EDGE of the cyan line). All wraps require a bleed. To accomplish this, please bring your design (any background color or images) to the OUTSIDE EDGE of this line. If your background is white, bring the white shape out to the bleed edge. Installers need a few inches of flexibility in all directions to cover the three-dimensional surface of a bus.
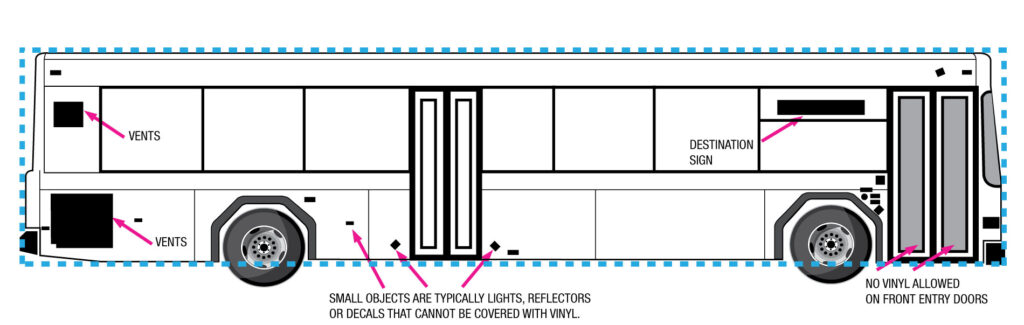
6. All greyed-out and solid black areas cannot be covered with vinyl material. Be sure not to place any important elements in these locations (text, logo or a person’s face). The window gaskets and panel breaks will be covered with vinyl. The engine vents are perforated metal and cannot be covered, so they will remain the color of the bus. Bus colors vary by market. (NOTE: Not all buses have elements in the same location.)
7. IMPORTANT: When the design is complete, please check the following to ensure your file will print as expected:
-
- Ensure all links are embedded.
- Convert all fonts to outlines.
- Resolution of any raster elements should be 150 PPI at full print size. Where all templates are designed at 1/10 scale, artwork will be scaled 1000% when processed for printing. Please take this into account when placing raster artwork within the template.
- More information regarding resolution: PIXELS AND PATHS
- Ensure no elements or layers are set to Overprint. They will drop out from the design when the file is processed for printing.
8. Save the file as a PDF.
9. Send the print-ready file to ATA Outdoor. Production contact: Jacinta Marlow, EMAIL JACINTA
-
- Email Jacinta if the file is smaller than 15M.
- Send via our WeTransfer page: ata.wetransfer.com
- Share via Google Drive.
- Share via your preferred file transfer service.
Once the file is received, we will assess it and send a proof for approval. We will flag any low resolution images, but correct copy and layout are the client’s responsibility.
If you have any questions about art setup or need more template help, please contact Danis Chamberlin, EMAIL DANIS.

See How Your Message Reaches Communities Across New England
As 2026 gets underway, we’re spotlighting the reach of transit advertising. This map…

We’re thrilled to be featured in the Bank of New Hampshire’s Small Business Spotlight series! The video highlights ATA Outdoor Media’s mission…